
How To Connect a Squarespace Button with a ConvertKit Form

This post may contain affiliate links. Which means if you make a purchase through them, I may receive a small commission at no extra cost to you!
I'm so grateful you landed on this page! I've updated this post (with a video!) You can catch the updated version right here!
I LOVE ConvertKit and Squarespace. They are two of my favorite platforms to use. Both are incredibly intuitive and have beautiful user interfaces.
But.
They don’t work together. At least not yet.
So, in the meantime, how do you add a ConvertKit button to your Squarespace cover page? Or any page for that matter. Squarespace buttons only allow for URLs to be linked to them. And ConvertKit doesn’t provide a URL for their sign up forms.
Today I want to show you a workaround I’ve recently learned that will add a button to your page that functions like a ConvertKit form.
Let’s go!
Creating a Squarespace Form
Once you're signed into your Squarespace account, click Pages in the menu bar on the right.

Now here is where you can choose whether you want a page that's going to show in your menu bar, or not. If you do, click the "+" next to "Main Navigation." If you want it to be hidden, click the "+" next to "Not Linked." Whichever one you choose, click Cover Page in the pop up box.

Now we're looking at the cover page template. For the sake of this tutorial, all we're going to be working with is the Action section. This is where you can change the settings of the buttons and forms on the page.

By default, there is a button on the page. To delete it, simply remove the text in the box under Buttons. Next, you'll want to move down to Forms. In the box that says "Button Label," enter the text you want to show on your button.

Once you enter the text, you'll see a new button on your page.

Now we're going to edit the form. You'll want your Form Name to be something catchy. Your visitors will see this when they are viewing the form.
Next we'll set up the fields. Go ahead and delete all of them except Email Address. That is the primary one we'll need.

If you want to collect first names as well, click the "+" and choose a text field and label it First Name. ConvertKit only collects first names. That's why we're having to make that edit.

Next we'll move on to Storage. In order to link to ConvertKit, we'll need to start with a Google Sheet. On this screen, click Google Drive and follow the steps to link your account.

Once your account is linked, you'll have a text box. Enter the name of your Google Sheet here. No need to create a Sheet prior to this step. This will create one automatically on your Google Drive.
Be sure to save your changes!

Connect Zapier to Send Subscribers to ConvertKit
Now comes the fun part! Let's hop over to Zapier to finish linking to ConvertKit. Once there and logged in, click Make A Zap!

For the trigger app, select Google Sheets. The trigger we're going to use is New Spreadsheet Row. This will add the names and email address of the people who fill out your form to the Google Sheet.

The next step is where you'll link your Google Drive account. If your account is already linked to Zapier, your screen should look like mine. If your account is not linked, you should see the option to Google. Go ahead and follow those steps if needed.

Once your account is linked, Zapier will ask you which sheet you want to use. In the top drop down box, select the sheet with the name you provided earlier to Squarespace.
In the second drop down box, select Sheet1. This just means that it will fill in the first sheet in that spreadsheet.

Here is where you'll want to go back to your form on Squarespace and fill it in with your name and email address as a test. Once you submit the form, you should see your information in the Google Sheet we created earlier. Once that is successful, click Fetch and Continue.

The next screen should so a successful collection of the information in the spreadsheet.
We're almost there!

For the second part of the zap, we're going to choose ConvertKit. I usually choose to add subscribers to a form. This way if you have any auto emails set up for new subscribers to a form, they will be entered into that automation. But if you would rather have them tagged or added to a sequence, you can do that too.

Next you'll be prompted to link your ConvertKit account if it is not already linked. Similar steps as linking your Google account above.

Now, let's tell ConvertKit where we want to put these new sign ups. The first box is asking what form you want to add the sign up to. Click the drop down arrow and you will see a list of all of the forms in your ConvertKit account. For this demonstration, I created a form called Sample, which I have selected.
Next, you'll want to select the fields. Click the drop down arrow next to Email and choose the Email field. When the list is down, you should see your email next to the email address field. This is from the successful test we ran above, pulling information from the spreadsheet.
Same goes for the First Name field. You should see your name in the drop down box from the successful test. This just confirms that all of the information is being transferred properly from the Squarespace form, to Google Sheets, to Zapier, to ConvertKit.

After you hit Continue, you should see a screen similar to the one below. This is showing the information that Zapier will be sending to ConvertKit. If all of the fields are populated correctly, click Create and Continue.

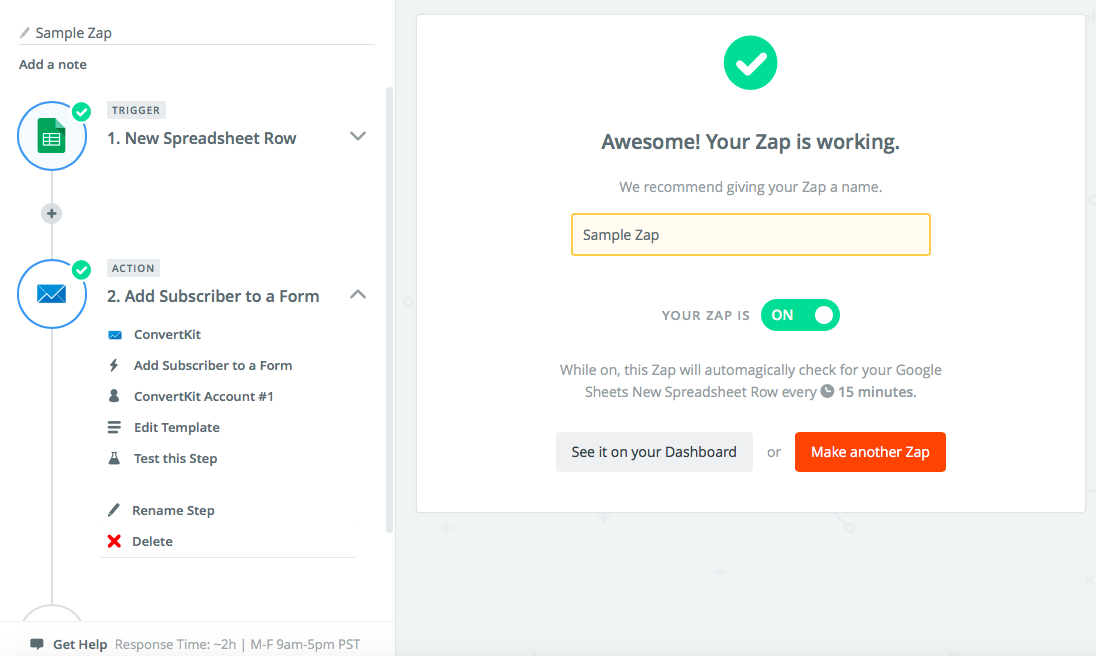
Once all is set up properly, you should receive a green bar and Test Successful message. Yay!

Now that everything is set up, be sure to name your Zap so you know what it is and turn it on. And you're all set!
I am sure this seems like a lot of steps, but it's a fantastic workaround way to have a neat sign up button on your website that links to ConvertKit. Once you go through the steps once, you'll be setting it up again and again with no sweat!
Just incase you need it, I've created a video to get you through these steps. Click here to watch it!
And if you’re not signed up with ConvertKit yet, check it out here!
Until next time, Loves!
xx,
Delana
Read the Latest


Hi, I’m Delana!
I'm a Business Systems + Operations Consultant for female entrepreneurs who are struggling to create defined, sustainable systems and processes in their business. I help them create the systems they need so they can confidently hire team members and get back to their clients… and their life!