How To Make Beautiful Graphics in Canva
This post may contain affiliate links. Which means if you make a purchase through them, I may receive a small commission at no extra cost to you!
Post updated 3/29/22
Hello, hello! I am so happy you are here today! Today I want to share with you how you can create graphics for Pinterest, Facebook, Twitter, etc using Canva.
Canva has become a super popular graphic design tool for those of us who are looking for something a little simpler than InDesign but still want to create stunning graphics.
I am going to take you through how I create a Pinterest graphic! Its roughly 5 steps and took maybe 10-15 minutes. But once you have one made, you can use it over and over as a template! Let's get started!
This is for you if…
You are brand spanking new to having to make your own graphics and have little to no design background.
You’re new to the online business space and have no idea how or why you need so many graphics or how to make them.
Or, you’re looking for an easier way to make graphics and are completely new to Canva.
Creating Graphics in Canva Step One:
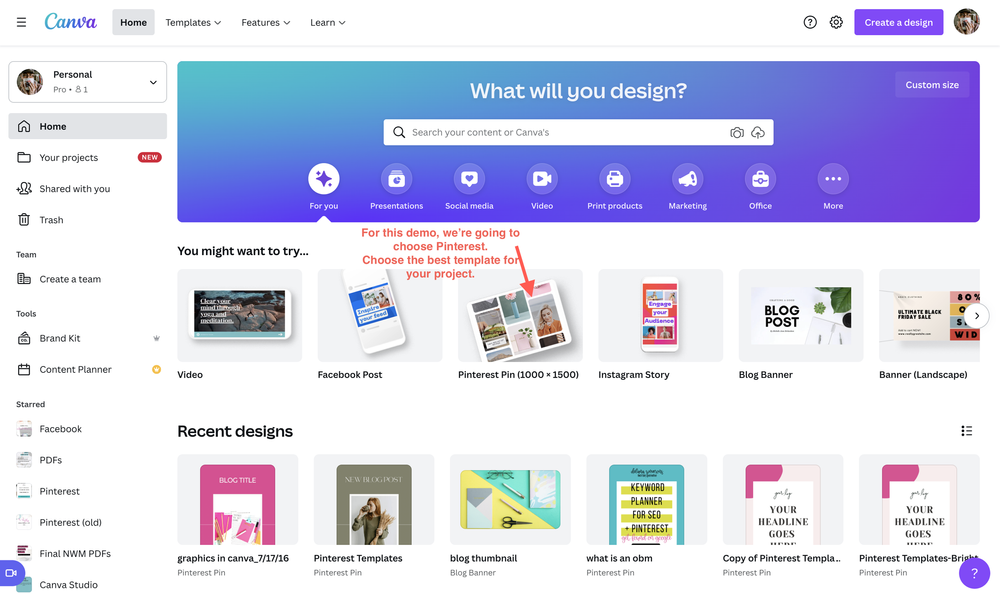
Choose Your Image Size
Its so important to have eye catching graphics that make people want to read your blog and see what all your awesomeness is about! Here is just how simple it is to use Canva to make gorgeous graphics.
Depending on where you want to share your graphic, you can start by choosing a design that will make your graphic the specific dimensions for that platform. SO incredibly helpful!
Canva is constantly updating image sizes based on platform changes. So most of the time you can be sure the sizes Canva recommends will work.
They have literally any graphic size you could need: Facebook, Instagram, Pinterest, YouTube… and on and on.
But if you need something customized, you can create that too.
💡 Pro Tip: If you have the Canva Pro plan, you can make an image in one size and Canva will automatically adjust it to another size for you so you don’t have to start all over. 🙌🏻
Creating Graphics in Canva Step Two:
Choosing Your Template
Canva is great because it offers a TON of templates to get you started. I use these templates a LOT. You can change any element to make it your own, but its nice to have that jumping off point until you figure out your vision.
Today, I want to show you how to start with. a blank template. To get a blank page, click Create Blank on the home page by hovering over the image size you want.
If you do want to use a template, click Templates in the top left corner and browse your heart out! Find one you like? Click on it to add it to your design, then edit away.
Creating Graphics in Canva Step Three:
Choosing Your Background
If you're ready to start from scratch, I recommend starting with your background. Of course this can be white, or a solid color if that's the look you're going for.
Personally, I like using a nice stock photo in the background. There are plenty of options for changing the filters or editing the photos to give them the look you want!
Canva has added TONS of stock photos directly to their interface that you can use in your graphics. This saves so much time hunting down the right graphic that you’re actually allowed to use.
To access Canva’s stock photos, click Photos on the left. If you don’t see them, click Elements and Photos should appear in the middle section.
💡 Pro Tip: Canva has a ton of options for free photos with the free account. But Canva Pro has way more options available where you don’t need to pay for each individual one you use. The same goes for other elements like gifs or design pieces.
Creating Graphics in Canva Step Four:
Adding Elements
Once done with the background, I add a few elements.
This can be arrows, boxes, circles, etc. Canva has a ton of options when it comes to design elements.
To access, click… you guessed it, elements!
You can choose from shapes, graphics, stickers, charts, tables, frames, and even music now that you can edit videos within Canva. The possibilities are endless!
One of my favorite things to do is add a square box shape over my background image and making it a solid color. This helps my text stand out and not get lost in the image. Check it out below.
Creating Graphics in Canva Step Five:
Adding Text
Finally, I add the text to my graphic!
You can set up brand fonts in Canva so the same fonts are always ready for you. Or you can choose one of the font combinations Canva provides and edit it to suit your needs.
I like. to choose something that’s easy to read. Especially if I’m making a Pinterest graphic. I want the Pinterest bots to be able to read the text easily. If you do use a script, make sure your keywords are in the plain text.
Make sure you balance out your text with the image. You don't want to have too much weight on one side or the other of your image.
I always put my website somewhere on my image so anyone who finds it will know where it’s from.
Creating Graphics in Canva Step Six:
Download Your Graphic
Once you've added your text and you LOVE how it looks, you are DONE!
Click Share to download and choose your download options. I save all my graphics to my desktop by default but yours may save to your downloads folder.
That wasn't so difficult now, was it? 😉 Like anything else, it really isn't once you get the hang of it.
The graphic you just created will be saved to your account. You can come back and edit it, or I like to copy it and use it as a template for other graphics.
Recap
Step one: Choose your image size. Select a pre-sized template or create your own custom size.
Step Two: Decide if you want to use a Canva template or start from scratch.
Step Three: Choose your background image.
Step Four: Add elements.
Step Five: Add your text.
Step Six: Download!
Creating your own graphics is a great way to establish your brand's look. Consistency is key to getting noticed. It's okay to play with the colors and texts a little, but overall you want your graphics to have the same look about them. You want people to start recognizing you and your AMAZING style!
xx,
Delana
PS: If video tutorials are more your thing, grab Canva Studio! In this training, I walk you through Canva basics including creating graphics, PDFs, and I’ve thrown in some templates so you don’t have to waste tons of time trying to figure it all out on your own! Learn more here →
Read the Latest
Hi, I’m Delana!
I'm a Business Systems + Operations Consultant for female entrepreneurs who are struggling to create defined, sustainable systems and processes in their business. I help them create the systems they need so they can confidently hire team members and get back to their clients… and their life!


