How to Create a Custom ConvertKit Footer
This post may contain affiliate links. Which means if you make a purchase through them, I may receive a small commission at no extra cost to you!
Well hello there! Today I wanted to show you how to create a custom footer for your ConvertKit emails. I know these can seem a little intimidating because you have to create a custom template and with ConvertKit that means a little bit of coding.
But I promise it’s not a difficult as it sounds! I’ll walk you through what to do below!
(Side note: if you want to skip all the reading, check out the video!)
So let's get started with creating your custom email template footer! I love doing this because it's a great way to add pieces of information to the bottom of your emails without having to add it every single time you send out an email.
There’s a couple reasons why this is a great thing to have set up. My favorite is it’s a super easy way to tell people where they can hang out with you outside of your emails. You can link to all your social profiles, Facebook groups, wherever you want people to follow you. This gives them more of an opportunity to follow you which is great for making connections!
Something else I love adding to my footers is reminders about any events or promotions I’m running. We all know how cheesy and sleazy it can feel to try to sell something in every. single. email. There’s no need to do that at all! But you still don’t want people to forget about what you’ve got going on. So just place a little reminder in the footer. “Hey don’t forget about the special I’m running this week! Check it out here.” And done!
No big, long sales pitch. Just a friendly reminder.
Alright, enough chitchat. Let’s get into this!
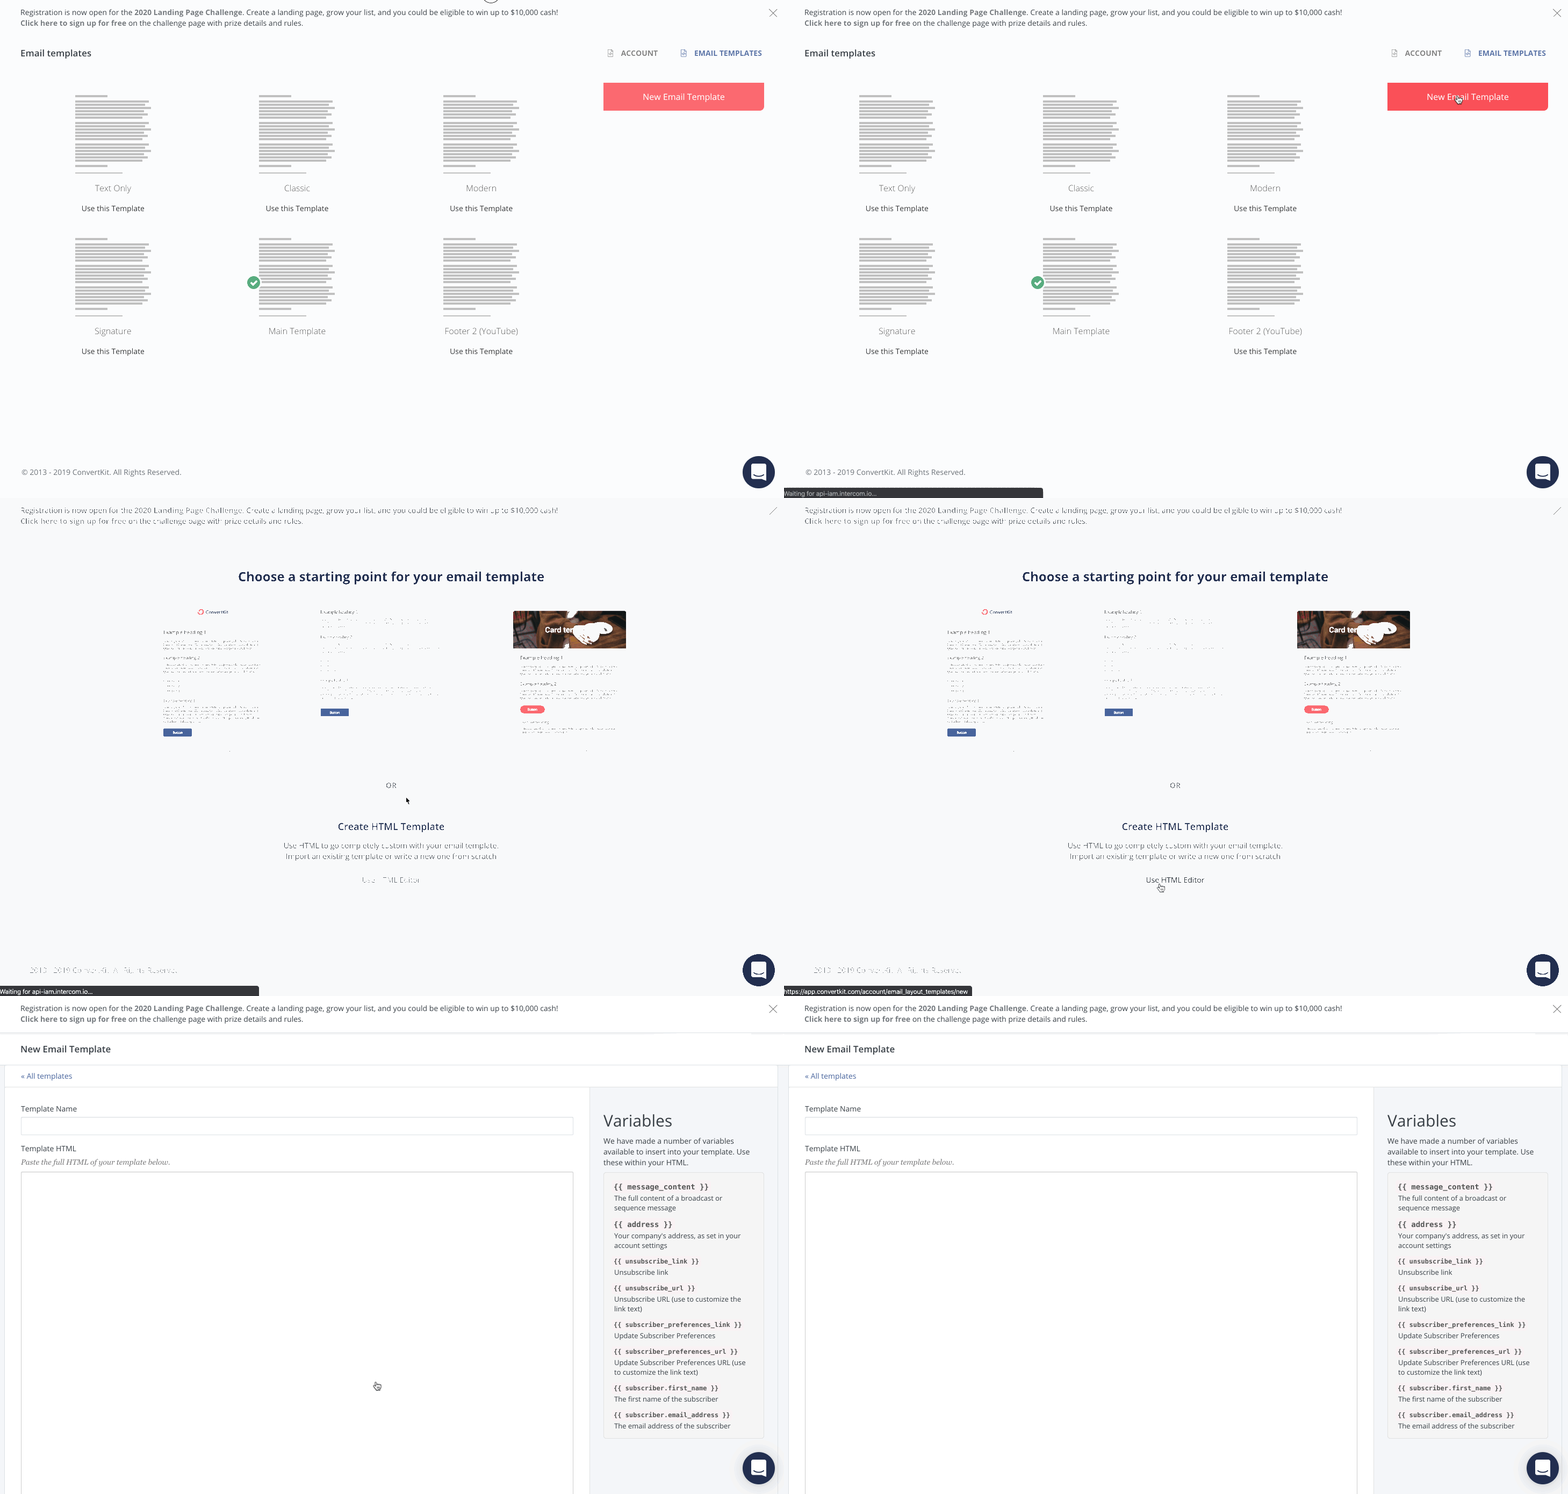
So when you're logged into your ConvertKit account (and if you don’t have one yet, you can sign up here!) you'll want to click on your name in the top right corner, then click Account Settings > Email Templates.
Now we’re on the Email Templates page. If you don’t have any custom templates, you’ll see the three ConvertKit provides.
The first thing you need to do is pick one of the three ConvertKit templates and copy the base code. I like the Modern template, so I’ll click on that and copy all of the code in the box.
Once you’ve copied all of the template code, go back to All Templates and click New Email Template. You’ll see a nice blank box on the screen. Paste the code you just copied into that box. Go ahead and name your template while you’re here!
This creates a customizable version of one of ConvertKit’s default templates.
Now, we’re going to be working in the bottom section of this template, underneath where you see
<div class="footer">
Anything under this line of code is in your footer.
In the footer, you’ll see the unsubscribe links. You can edit these but don’t delete them!
So what we want to do is add some extra information in here for our readers. In the screenshot above, you can see I’ve already added some text and social link icons. Here’s what that footer looks like in action:
You can see I’ve also added some text to invite people to a Facebook group and I’ve customized my unsubscribe links a bit.
You can add anything you want!
So if you wanted to add the “Are we hanging out on social?” line, you’ll add this piece of text
<h3 style="color: #02778b;">Are we hanging out on social?</h3>
You can change the color by changing the hex code #02778b to your color. And change the text in between the > < brackets.
(You can download a PDF with the full block of code I use in my custom footer at the bottom of this post!)
To add hyperlinked text, for example, the YouTube channel link, you’ll use a piece of code like this:
<a href="https://www.youtube.com/channel/UCjMMjynuxxMe9aoEPRgfFaQ?/">YouTube channel!</a>
Replace the YouTube link with the link you want to use and replace the text between the > < brackets with the text you want to make clickable.
You’ll use this same process for the social link icons, but you’ll need to add the image URL’s. You can use any images you want if you have the URL for them. That’s a post for another time 😉 So if you’re ready to get rocking and rolling with your footer, I’d use the ones ConvertKit provides. Why make things more complicated than they need to be, right?
Just be sure to update each icon with the link to YOUR accounts!
For a more visual walk through of creating your footer, check out the video below! And don’t forget to grab your cheatsheet with the code you need to get going!
UPDATE 12/31/19:
You can still use the steps above to edit your ConvertKit email template and footer. But a few months ago, ConvertKit released new email templates that can be edited visually, instead of with HTML. Which is awesome!
But, at the moment, the footer in these templates can’t be designed like the HTML ones. You can add text directly around the unsubscribe links and the address, but that’s about it. There isn’t currently a way to design a fully customized footer.
Now, if you want to use the HTML template to customize your footer, that’s still an option, but the beginning steps have changed just a tad. So here we go!
Start by going to your Templates page. Click to Create a new template. Under the new templates, you’ll see Create HTML template. This will open up a blank new template for you.
Now, you’ll need to start with a base HTML template. ConvertKit has created 3 you can use. They don’t show up in some newer accounts, but you can grab the HTML below along with the HTML I used for the footer I created above.
Once you’ve copied that code, just paste it into the template.
Now you have the base code for your HTML template. Just head down to the footer section and follow the steps above to customize!
And voilá! A beautiful custom footer!
xx,
Delana
PS: Hey Solopreneur! I see you over there trying to do all the things. Guess what, you don’t have to! A Tech Clarity Sesh is just what you need to move past the tech blocks keeping you stuck. Learn more here and send me a message on the info page! ✨
Read the Latest
Hi, I’m Delana!
I'm a Business Systems + Operations Consultant for female entrepreneurs who are struggling to create defined, sustainable systems and processes in their business. I help them create the systems they need so they can confidently hire team members and get back to their clients… and their life!


